Field | Description |
Line Number | Click once to select and edit any color-coded line (1–n). |
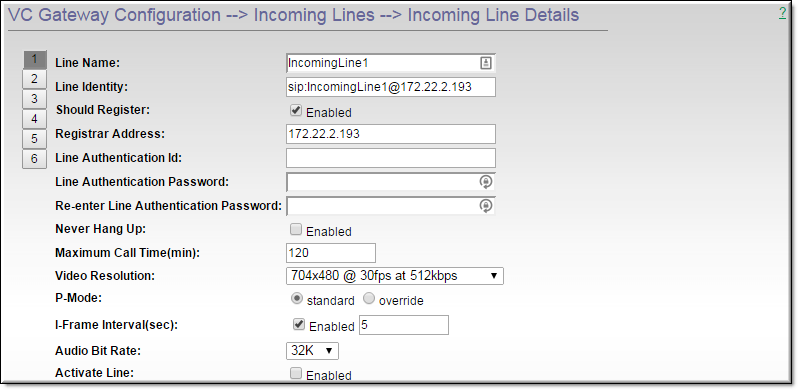
Line Name | User-configured line name. Default = IncomingLine<n> |
Line Identity | The DME line name and IP address in the format shown. This is the identifier the remote videoconferencing unit will use to call into the DME: sip:<line_name>@<dme_ip_address> |
Should Register | The session will be registered with a SIP registration server if present. Default = Enabled. |
Registrar Address | Optional field to add the IP address of a registrar if one is required. This field is only used to override the IP or address in the line identity for registration. |
Line Authentication Id | Line Authentication Id for configured SIP registration server. |
Line Authentication Password | Line Authentication password for configured SIP registration server. |
Never Hang Up | Do not hang up. If you leave the call connected it will automatically hang up after 720 minutes. |
Maximum Call Time | Maximum duration for any call after which the system will automatically hang up. Default = 120 minutes. |
Video Resolution | Select from dropdown list. Sets the desired video encoding resolution (the width and height respectively) of the compressed video stream. Note that the actual resolution is determined by negotiation between endpoints. ●1920x1088 @ 60fps at 4096kbps ●1920x1088 @ 30fps at 2048kbps ●1280x720 @ 60fps at 2048kbps ●1280x720 @ 30fps at 1024kbps ●960x544 @ 30fps at 1024kbps ●704x480 @ 30fps at 512kbps ●704x576 @ 25fps at 512kbps ●352x240 @ 30fps at 256kbps ●352x288 @ 25fps at 256kbps |
P-Mode | Packetization mode defines the packetization rule for the incoming/outgoing stream. Default = standard. Do not change except as directed. |
I-Frame Interval | Video conferencing systems typically do not send IDR frames although they are required for most players. This is the frequency at which IDR (Intra Dynamic Refresh) frames are inserted. Default = 5 seconds. Valid range is 1 - 8 seconds. |
Audio Bit Rate | Select from dropdown: 16K, 32K, 64K. |
Activate Line | The line cannot be used for a videoconference until it has been activated. Default = disabled. |
Field | Description |
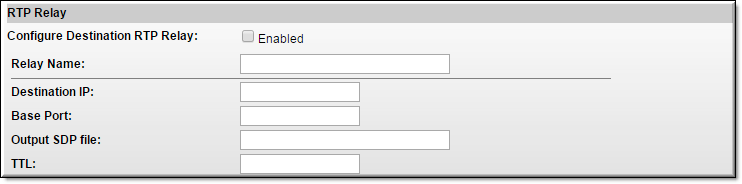
Configure Destination RTP Relay | Check box to automatically configure a destination RTP relay to stream the video conference over RTP. Instead of going to the RTP Relay Overview page, you can simply check this box to run a wizard that automatically creates the destination relay. A destination RTP relay forwards a multicast stream to local users in an IP network using an auto-generated .sdp file that becomes part of the URL to the stream, for example: http://<dme_ip_address>/mystream.sdp. When clients open a player and point to the .sdp file with a URL, the player will tune into the stream. Be aware that if you change the setting on this page (for a previously created relay) you will actually be creating a new relay and leaving the old relay in place. Consequently you will need to open the RTP Relay Overview page and manually disable and delete the old relay. For best results, if you need to make changes, edit the relay on the RTP Relay page rather than on the VC Gateway page. |
Relay Name | Enter a unique name for the relay. |
Destination IP | Enter a valid multicast address for your network, for example: 239.22.118.72 |
Base Port | Use this parameter when pushing the stream to another DME. The base port will be incremented by 2 for each RTP stream. Use numbers that are not already being used for the entire SDP sequence set. |
Output SDP File | Enter a name for the auto-generated .sdp file. |
TTL | Specify the number of routers the multicast stream will pass through before it stops propagating over the network. Range = 1–255. |
Field | Description |
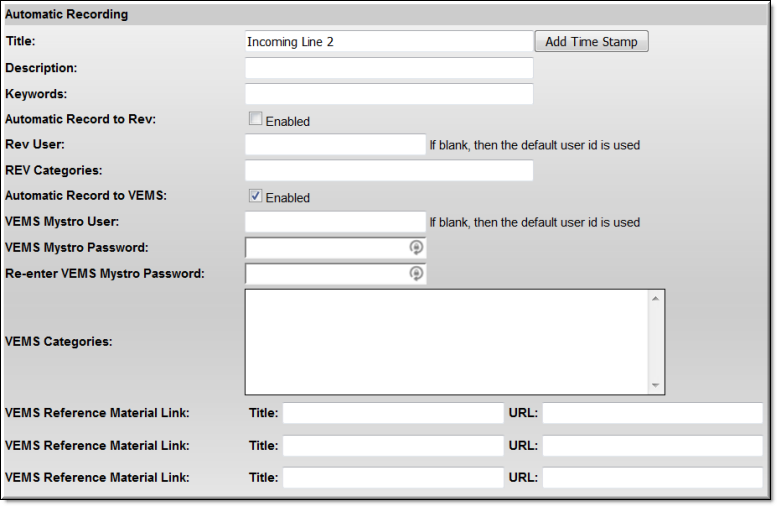
Title | ●Used for recording to both VEMS and Rev ●Default – "Incoming Linen n" ●Add Time Stamp – appends the date and time to the VEMS title. For example:Incoming Line_n_12_01_27_15_02_51 |
Description | ●Used for recording to both VEMS and Rev ●Descriptive metadata for recorded video. |
Keywords | ●Used for recording to both VEMS and Rev ●Keywords metadata for recorded video. |
Automatic Record to Rev | Automatically record the video conference and upload it to Rev. Default = disabled. |
Rev User | If the video conference is recorded, it will be uploaded to Rev for this user under My Videos. If blank, this user will be the default user defined on the Rev Interface page. |
Rev Categories | Rev metadata. The categories that the recorded stream will be associated with. These categories are determined by local Rev administrators. Unrecognized categories are ignored. |
Automatic Record to VEMS | Automatically record the video conference in VEMS Mystro. Default = disabled. |
VEMS Mystro User | If the video conference will be recorded to VEMS, the VEMS user name it will be associated with. This user determines which categories will be available for the recorded video. If blank, this user will be the VEMS Mystro User configured on the SIP Defaults page. |
VEMS Mystro Password | If the video conference will be recorded to VEMS, the VEMS password it will be associated with. If blank, this user will be the VEMS Mystro Password configured on the SIP Defaults page. |
VEMS Categories | VEMS metadata. The categories that the recorded stream will be associated with. These categories are determined by the configured VEMS Mystro User. Note: If category permissions are changed on the VEMS Mystro server, it may take up to 30 minutes before the updated categories are shown on this DME page. |
VEMS Reference Material Link | VEMS metadata only. This will add a link to a web page on the Reference Material tab. ●Title – Descriptive name for URL. ●URL – Fully qualified path to a web page. |
Note: The Incoming and Outgoing Details pages have an OK button (in addition to Apply, Revert, and Default). Use the OK button to save changes and exit back to the previous page. Use the Apply button to save changes without leaving the Details page. This makes it easy to edit a different line without leaving the Details page. |