Enable Webex Meetings Integration
Users may upload their Webex meeting recordings (My Webex > My Files > My Recordings) if Rev’s Webex Meetings Integration has been enabled. This option is disabled by default. Only Account Admins and Media Admins are able to enable and disable the integration.
Caution: This integration requires that AllowDownloadRecordingWithoutPwd is enabled for your Webex site as described in, "F9847 A New Download URL is able to Download Recording Directily”. Submit a ticket to the Webex Provisioning Team to enable this flag before proceeding. |
1. Navigate to Admin > Media Settings > Integrations.
2. Scroll to the Webex Meetings section.
3. Select the Webex Meetings Integration checkbox.
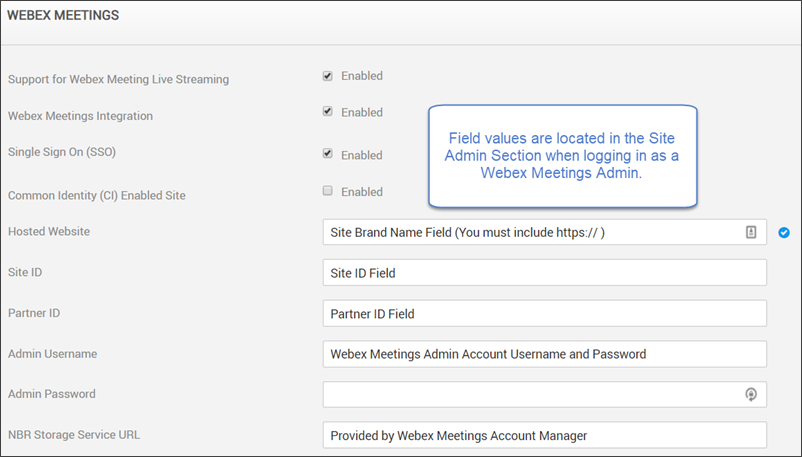
4. Complete the remaining fields as needed:
a. Support for Webex Meeting Live Streaming: Controls live streaming from Webex Meetings options.
b. Single Sign On: If enabled, users will not be prompted for Webex log in each time when uploading video from Webex. Rev credentials will be used instead.
●Note: You may not have both the SSO and CI Site checkboxes enabled at once. If you select one, make sure the other is deselected. A user will not be prompted to login for both SSO and CI-enabled sites.
c. Common Identity (CI) Enabled Site: Selecting this checkbox creates a CI-enabled site. This should be completed by a Webex Site Admin. See details on the set up options below.
●Note: You may not have both the SSO and CI Site checkboxes enabled at once. If you select one, make sure the other is deselected. A user will not be prompted to login for both SSO and CI-enabled sites
d. Hosted Website: The Site Brand Name field found in the Site Administration section when logged in Webex Meetings as an Admin. You must include https:// here.
e. Site ID: Site ID field found in the Site Administration section when logged in Webex Meetings as an Admin.
f. Partner ID: Partner ID field found in the Site Administration section when logged in Webex Meetings as an Admin.
g. Admin Username: Webex Meetings Admin account user name
h. Admin Password: Webex Meetings Admin account password
i. NBR Storage Service URL: Typically provided by your Webex Meetings account manager.
5. This will add an Import tab when adding video in Rev that will allow the user to import Webex Meetings recordings.
Common Identity (CI) Enabled Site Settings
When you create a CI-enabled site, users are supported with a Common Identity which means that those with multiple accounts (with the same email address) will always be directed to the Common Identity login flow.
To create a CI-enabled Site, you must create a Webex Teams app to grant Rev permissions to Webex Meetings (specifically, spark:all scope permissions). This is done through the Cisco Developer site by creating a new Integration. When creating the CI-enabled site, Client ID and Client Secret can then be obtained from the App.
Note: If you previously created the Webex Teams app to enable the Webex Teams integration in Rev, you may modify your existing app instead of creating a new one here. |
1. Make sure the Common Identity (CI) Enabled Site checkbox is selected and SSO is deselected.
2. Make sure your Webex Teams App is created or modified with the spark.all scope permissions and you have obtained your Client ID and Client Secret from the OAuth Settings section once saved.
3. A new set of fields will appear for providing authentication options. All fields are required and should be completed by a Webex Site Admin.
4. Site Name: This is normally provided by Webex. By default, it is the sub-domain on the webex.com URL. For example, for acme.webex.com, the site name is acme.
5. Client ID: Provided by the Webex Teams app.
6. Client Secret: Provided by the Webex Teams app.
7. Link to Webex Site button: Once you are ready, this button launches authentication to Webex to obtain an access token. Status is displayed directly on the button.
○Green checkmark: Linked - authentication is established and access token was received and is valid (last known).
○Red X: Not currently authenticated or the access token is now no longer valid or in a current state of authentication.
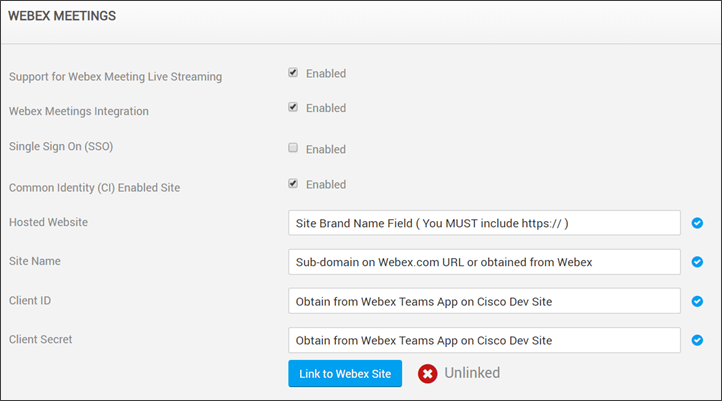
Warning: For CI-enabled sites, it is possible for the Webex access token to expire or become invalid. If this occurs: ●The Link to Webex Site button will display an Unlinked status (see image above). ●A notification email will be sent to the Rev Account Admin that originally authenticated to Webex that the integration should be updated/authenticated again. ●A Rev notification flag will appear. |
Keep in mind for all Webex integration sites:
●The user will be prompted to log in with a valid Webex Meetings account each time if not already logged in. (If SSO is not enabled)
●The Import tab will list the 100 most recent video files (within the last 180 days only) in the user’s Webex account that are available in MP4 format. (Note: Legacy Webex accounts with .arf files are not supported in this integration)
●The newest video files are listed first with the following attributes:
○Recording name
○Create date and time
○File size (MB)
○If the file has already been imported to Rev (if previously uploaded and deleted, it will not be marked as imported)
○Multiple files may be selected and imported