Disk Status

To access the Disk Status information:
1. Navigate to > .
In some configurations it may be desirable to extend the storage space of your DME. This can be done in the following ways: (1) add a new virtual disk to a VM, (2) add a new physical disk to a medium or large DME (small DMEs do not have the capability of adding additional space), or (3) add a network storage device (See:
SAN/iSCSI Setup).
If you have added a new virtual or physical disk, then the page will allow your DME to access the disk. Disks that are added to the DME in this manner are merged into a single, common storage location. Therefore, once added, these disks cannot be removed (if physical) or deleted (if virtual) – and the DME will be rendered inoperable if a disk is removed. Please plan accordingly.
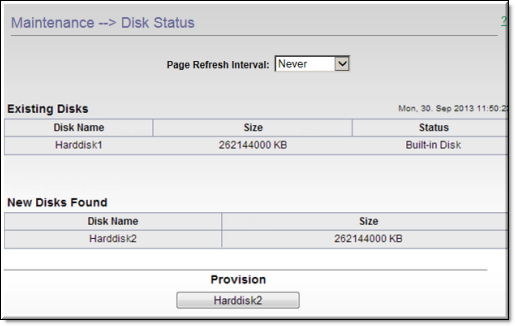
This page shows the size and status of (i.e. those disks that were present originally or were added using the “provisioning” process) and of which have not yet been provisioned.
Field | Description |
Page Refresh Interval | ●Never – Never refresh page. ●30 seconds – Refresh page every 30 seconds. |
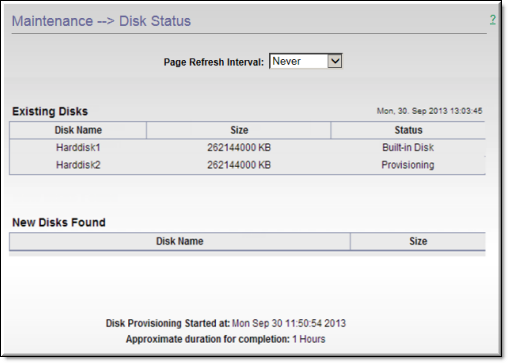
Existing Disks | ●Disk Name – Disk name. ●Size – Configured size in KB. ●Status – Displays either "Built-in Disk" or "Provisioning" if a provisioning is in progress. |
New Disks Found | ●Disk Name – Disk name. ●Size – Configured size in KB. |
Provision | Shown only when a new disk has been found. Click the named button to start the provisioning process for that disk. Note that this step is irreversible. See Provision a New Disk for more information. |
| Note: When extending space with Virtual Disks, VBrick recommends creating additional virtual disks and provisioning them using the > page. While VM hosts allow the expansion of already provisioned virtual disks, they do not automatically expand the OS disk partitions contained within. Meaning, the DME does not detect that expansion of the partition on the virtual disk so the added space will not be detected. Alternatively, iSCSI disks can also be added to VMs – please see SAN/iSCSI Setup. |
Provision a New Disk
To provision new disks, first turn off you DME (either physically or shutdown a VM). Add the disk accordingly. After restarting your DME you should see the new disk in the table with a button to "". Provisioning is the act of formatting (for xfs file system) and adding the new disk storage to the DME common data storage location. In other words, this extends the existing files system over the new disk and the new disk may not be removed once provisioned.
It is also important to note that for VM installs VBrick only supports the expansion of the disk space by creating additional virtual disks and provisioning them using the > page. While VM hosts may allow the expansion of virtual disks, they do not automatically expand the disk partitions within the VM OS. Meaning, the DME does not detect that expansion of the partition on the virtual disk. The solution in this case is to add an additional new virtual disk.
SAN/iSCSI use is a different model. Please refer to the help page
SAN/iSCSI Setup.
| Note: ●Be aware that disk provisioning is irreversible. Once you have added a new virtualized disk, it cannot be removed. ●Always create a VMWare "snapshot" before you begin so that you can revert to you original configuration if anything goes wrong. ●Provisioning a disk is not the same as adding an iSCSI disk to the DME . If you are adding an iSCSI disk see the topic on SAN/iSCSI Setup. |
To add a new disk in a virtual environment:
1. Navigate to > .
2. Use the button and shut down your DME. Verify with the virtual host to make sure the device is shutdown.
3. As a best practice, create a snapshot of the virtual machine using the virtual host tools or some other method. This will allow you to revert if anything goes wrong.
4. Add a disk to this virtual machine using the virtual host tools or any other method you use to manage your virtual machines.
5. When done, restart the DME virtual machine.
6. After the restart, navigate to > .
As noted, a new disk will be shown in the area (shown below) and a named button will let you provision the new disk. If you added more than one disk, the button will provision only one disk at a time and you will need to repeat the provisioning process for each additional disk.
7. Press the button to begin provisioning the new disk as an extension to the existing disk. A pop‑up message will indicate approximately how long this will take. (The provisioning time is usually minimal but may take several hours depending on the type of disk being added.) Be aware that this will stop all streaming services from the DME until provisioning is complete and the device reboots.
8. When provisioning is complete, the DME will reboot, the streaming services will restart, and the >
Disk Status page will show the new disk as active and available for use.
9. Navigate to > System Usage and the field will show exactly how much space is in use and available for use.