Task | Description |
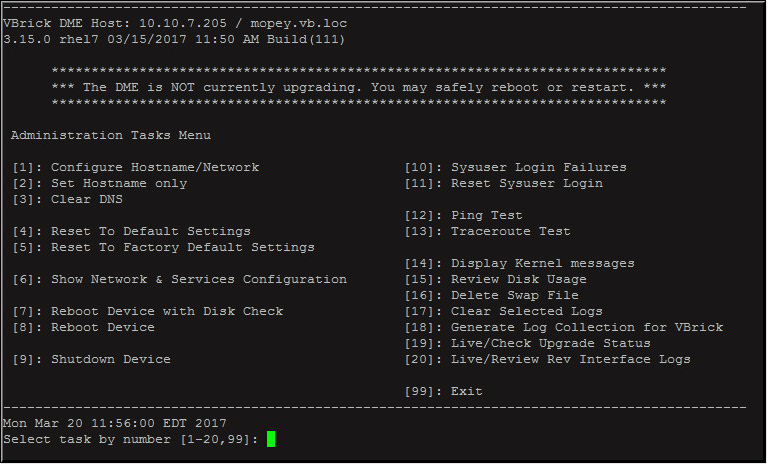
Configure Hostname/Network | Used to quickly configure your network settings. This includes the ability to configure for DHCP or static address and designate an IP address, Subnet Mask, and Gateway. This is the same ability that is included on the System Configuration > Network screen on the DME. This allows you to set the FQDN, IP/Subnet/Gateway/DNS addresses, and your Search Domain for your DME before you begin using your appliance. Changing parameters in this task may require a system reboot. Please do not reboot during any upgrade activity (identified at the top of the screen). Type “1” and hit <Enter> at the “Select task by number” prompt. |
Set Hostname Only | The DME Host Name may also be defined on System Configuration > Network page. It will display in the banner graphic in the top right area of all DME vbAdmin configuration pages and defaults to DME <Mac_Address> which is a hardware address unique to each node of a network. The DME Hostname also identifies the appliance to various network applications including DHCP and the VBDirectory management application. Changing this value will force the DME to create a new self-signed certificate. Please review SSL Certificates management section in Help for more details. Changing parameters in this task may require a system reboot. Please do not reboot during any upgrade activity (identified at the top of the screen). Type “2” and hit <Enter> at the “Select task by number” prompt. |
Clear DNS | If the DNS entries are not reachable, the device may respond sluggishly. Clearing the DNS entries will alleviate the situation. This will temporarily remove the Primary and secondary DNS settings. These session will return once the system is rebooted. This will also remove any Search Domain settings – which will not return and must be re-entered within vbAdmin. Type “3” and hit <Enter> at the “Select task by number” prompt. |
Reset to Default Settings | This task resets most settings (except for network settings and passwords) to their default settings. The same task may be executed from the System Configuration > Manage Configuration form in the DME. Type “4” and hit <Enter> at the “Select task by number” prompt. |
Reset to Factory Default Settings | This task resets ALL settings (including network and passwords) to factory defaults. Use with caution. The same task maybe be executed from the System Configuration > Manage Configuration form in the DME. Type “5” and hit <Enter> at the “Select task by number” prompt. |
Show Network & Services Configuration | This task will show various details of your network settings and running services. Each report will display the DME Hostname and command to the screen and wait for you to “Press Enter to continue”. Type “6” and hit <Enter> at the “Select task by number” prompt. |
Reboot Device with Disk Check | If the DME is shut down improperly, the disk may need to be checked to verify and recover any bad sectors. Use this option to do so. Depending on the size of your disks, this may take a great deal of time. Type “7” and hit <Enter> at the “Select task by number” prompt. |
Reboot Device | Reboots the device without running a check disk. Type “8” and hit <Enter> at the “Select task by number” prompt. |
Shutdown Device | A graceful shutdown and power off that will require human intervention to power the device back on. Type “9” and hit <Enter> at the “Select task by number” prompt. |
Sysuser Login Failures | Displays information related to the current login failures for the Sysuser. The current lockout is set to 3. Type “10” and hit <Enter> at the “Select task by number” prompt. |
Reset Sysuser Login | This will reset the login password to original settings and reset any log in failure that may have occurred for the Sysuser. Type “11” and hit <Enter> at the “Select task by number” prompt. |
Ping Test | This task will allow entry of a hostname or IP address to perform a ping test. Five tests will be performed and displayed. This is a useful feature to test your connection to your Rev instance or other online hostnames. Type “12” and hit <Enter> at the “Select task by number” prompt. |
Traceroute Test | Like the ping test, this task will allow entry of a hostname or IP address to perform a traceroute. Each line will be displayed with a max of 30 hops. Type “13” and hit <Enter> at the “Select task by number” prompt. |
Display Kernel Messages | This task displays the contents of the system console (kernel ring buffer). Use this test only with support from VBrick Customer Support. Type “14” and hit <Enter> at the “Select task by number” prompt. |
Review Disk Usage | This task displays the disk usage for attached disks. Type “15” and hit <Enter> at the “Select task by number” prompt. |
Delete Swap File | This task will delete the Swap file. This is only a temporary deletion, as the Swap file will be rebuilt on next reboot. (That will take additional time for 7550s and 7570s.) Type “16” and hit <Enter> at the “Select task by number” prompt. |
Clear Selected Logs | This task will step through a series of system logs and prompt for removal. Type “17” and hit <Enter> at the “Select task by number” prompt. |
Generate Log Collection for VBrick | This task item will create an encrypted file, stored in the ftp root under the zippedlogs directory. This file should only be created if/when VBrick Customer Support requests it. It will only be able to be de-crypted at VBrick. Depending on the size of your DME logs, this may take up to an hour to create. Type “18” and hit <Enter> at the “Select task by number” prompt. |
Live/Check Upgrade Status | This task will display two logs: dmeupgrade.log (also available from the vbadmin page) and rpmupgrade.log. If the system is currently performing an upgrade, then the rmpupgrade.log will be live. Meaning, once you are viewing the log, please hit Ctrl-C to exit viewing it. This is useful to follow along with an upgrade if necessary. If the system is not performing an upgrade, then the system will just display the log normally. Type “19” and hit <Enter> at the “Select task by number” prompt. |
Live/Review Rev Interface Logs | This task will allow direct viewing of the Rev Interface logs. This should only be executed in conjunction with VBrick Customer Service. Type “20” and hit <Enter> at the “Select task by number” prompt. |
Exit | Type "99" and hit <Enter> at the “Select task by number” prompt. |